🛠️ RSS Workspace
Table of contents
Please create an issue for any missing library, package, driver, error, or any kind of unclear instruction related to the RSS Workspace.
The RSS Workspace is a all-in-one development environment for the Super Mega Bot (SMB). It contains all the necessary packages, tools, and configurations to develop, simulate, and test the SMB project.
Under the hood, the workspace uses Docker and VSCode Dev Containers to provide a consistent development environment across different platforms.
This has been tested on the following platforms:
- ✅ Ubuntu 22.04/20.04 AMD64
- ✅ Windows 11 AMD64
- ✅ MacOS Sonoma AMD64 and ARM64 (Apple Silicon)
For other Linux distros, the steps should be similar to Ubuntu and work for both AMD64 and ARM64 architectures. For Windows 10, the steps should be similar to Windows 11. The same applies to different versions of MacOS.
📋 Prerequisites
Git
Make sure you have installed Git on your system. (Instructions)
Docker
Make sure to install the latest Docker.
Configure Docker Desktop (Windows/Mac)
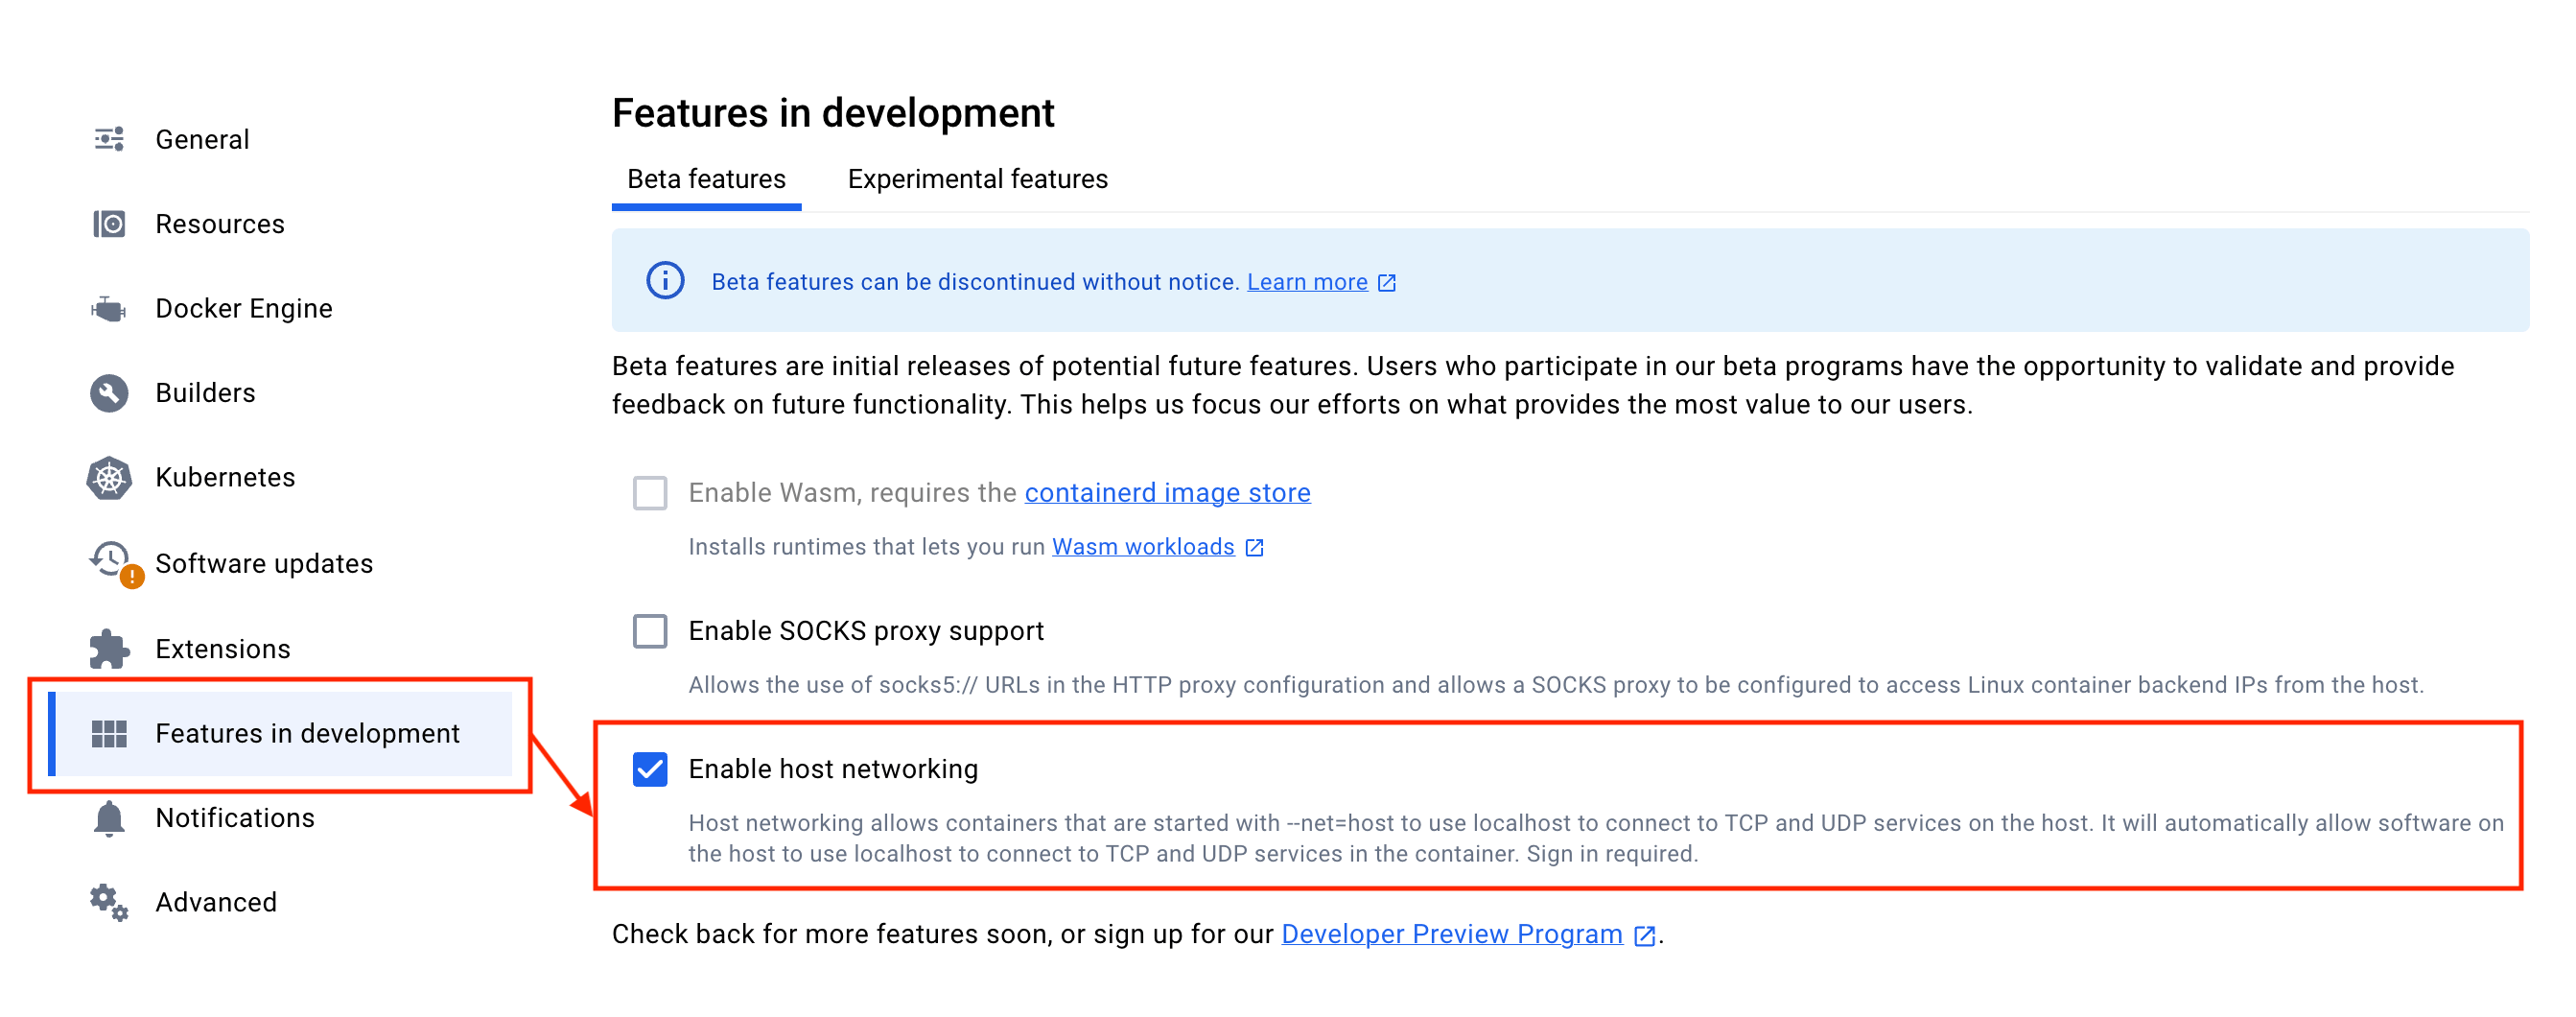
Turn on the Network Host mode in the experiemental features section in Docker Desktop settings.

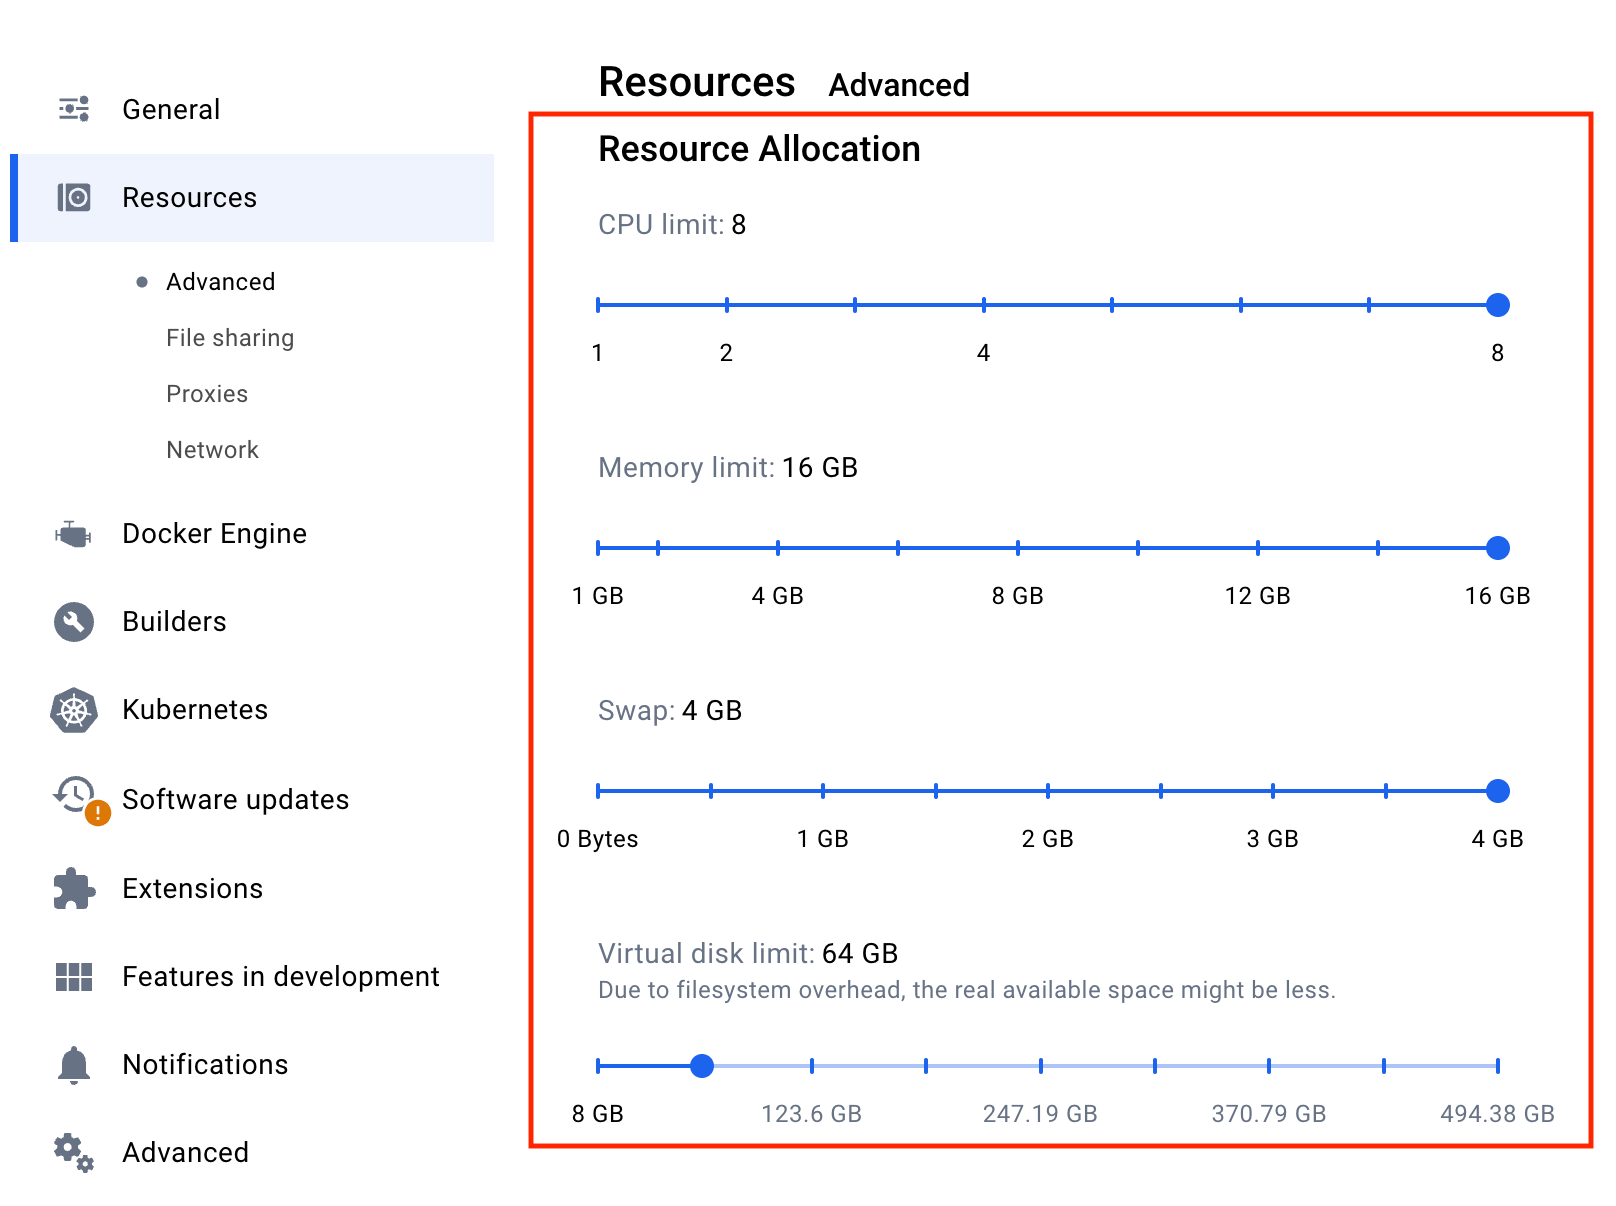
Configure Resource Allocation (Optional)
If you encounter any performance issues, you can adjust the resource allocation settings as needed.

VSCode + Dev Containers Extension
- Ensure you have a working VSCode setup and that it is up to date to avoid any issues.
- Install the Remote - Containers extension in VSCode.
(Optional) Install Real VNC Viewer
- Required if you want to run GUI application with VNC.
- Install Real VNC Viewer by following the official website
(Optional) SSH-agent
- To use SSH (for pushing commits to GitHub and connecting robots over SSH) inside container without copying your private ssh-key, you need to setup ssh-agent locally and add your ssh key to the ssh-agent. See the preparation step 2 here for more details.
(Optional) Fork the repository
- If you want to customize your workspace and save your changes, you can fork the repository to your GitHub account and clone the forked repository.
⚙️ Open workspace locally
Method 1: Clone the workspace to your local file system and open it in VScode.
For macOS and Windows users, we recommend using Method 2 to avoid performance issues.
Click here for more details!
The Dev Containers extension uses “bind mounts” to source code in your local filesystem by default. While this is the simplest option, on macOS and Windows, you may encounter slower disk performance when using
catkin buildor other disk-intensive operations. If you encounter this issue, consider using Method 2.
Clone the workspace
# replace the URL with your forked repository if you have forked it
git clone https://github.com/ETHZ-RobotX/rss_workspace.git

# Open the workspace in VScode. You can also open the folder in VScode manually.
code rss_workspace
Reopen workspace in dev container
Press Ctrl+Shift+P or F1 to open the command palette, type Reopen in Container and select the command to reopen the workspace in a Dev Container.
Method 2: Clone the workspace to a docker volume and open it in VScode.
TL;DR: Click the badge above or here to open the workspace in a Dev Container. If the link does not work, follow the detailed steps below.
Click here for detailed steps!
-
Copy the following link or the forked repository link to the clipboard
https://github.com/ETHZ-RobotX/rss_workspace.git. -
Open the Command Palette in VScode by pressing
F1. -
Search for “clone” and select Dev Containers: Clone Repository in Container Volume.
-
Paste the copied link into the box and press enter.
-
The dev container will set up properly. (This might take some time as it pulls base docker images and builds locally. You can click
Starting Dev Container (show log)at the bottom right to see the progress.)
You won’t be able to access the workspace files directly in the local file system. The workspace files are stored in the docker volume.
Click here for more details!
This method will clone the workspace to a docker volume. File data will be chunked and managed by Docker. Though, the chunked data are stored in the local file system, you cannot access them directly. This may be useful if you want to keep your local file system clean or if you encounter performance issues when using the workspace on macOS or Windows. To know more about the docker volume, please refer to the Docker documentation.
🛠️ (Optional) Building the SMB Catkin Workspace
You can build all packages at once by running
catkin build
or build a specific package when needed by running
catkin build <package_name>
Be cautious,
catkin buildcompiles files in parallel, which may quickly eat up your memory and CPU resource. We provide a shell aliasbuild-limitto limit the number of parallel jobs and memory usage defined as follows:alias build-limit="catkin build --jobs 8 --mem-limit 70%"
build-limit and catkin build can be used interchangeably.
🖥️ Using the Terminal
Integrated Terminal
We use zsh by default in the integrated terminal. You can set up your shell preferences in .vscode/settings.json or click the dropdown button in the terminal to select the default shell profile.

Every terminal opened inside VSCode sources the system ROS setup file by default. To source the RSS catkin workspace setup file in newly opened terminals, we provide a shell alias wssetup defined as follows:
alias wssetup="source ${ROOT}/devel/setup.zsh"
where ${ROOT} is a pre-defined variable pointing to the workspace root directory inside the container. You can simply use wssetup to source the workspace in the terminal.
Multiple Terminals with tmux
When working with ROS, it is often useful to have multiple terminals open. We provide a pre-configured tmux session with multiple panes. You can start the tmux session by clicking the dropdown button in the terminal and selecting smb-tmux.

smb-tmux runs scripts/start_smb_tmux.sh to start the tmux session under the hood. We highly recommend modifying the script to suit your needs. When remote accessing the the physical robots, you can copy the script to the physical robot and run it to have a similar tmux session.
👣 Additional Steps
Windows Users
In each terminal, you have to manually set the ROS_HOSTNAME.
export ROS_HOSTNAME=localhost
🖼️ Visualizing GUI
Using X11 forwarding
Works only on Linux
This works out of the box in Linux; when a GUI is launched, the window pops up.
Please note that this might have some rendering issues when the windows are resized, especially in RViz.
Using VNC (remote desktop) (Recommended for Windows/Mac)
Works on Linux, Windows, and Mac
- Modify the line #20 in the
.devcontainer/devcontainer.jsonto"DISPLAY": ":1"and optionally modify the line #9 in the same file to set the resolution of the VNC viewer.
- Rebuild the workspace by opening the command palette (
Ctrl+Shift+P) and selectingRemote-Containers: Rebuild Container.
Use VNC Viewer to connect to the desktop environment of the workspace.
- Open the RealVNC Viewer.
- File -> New Connection.
- Add
localhost:5901as the VNC Server. The default password isrobotx. - Click Ok.
- Click and open the new connection.
- Ignore the unencrypted connection issue.
Now you can see the desktop environment inside the VNC Viewer. You may need to adjust the picture quality settings in the VNC Viewer settings to get the best experience.
Try a GUI application
You can try to run the smb gazebo simulation inside the workspace to see if the GUI application works.
You can run the following command to start the simulation:
cd /workspaces/rss_workspace
catkin build smb_gazebo # Build the package if not built
source devel/setup.zsh # Source the workspace setup file if not sourced
roslaunch smb_gazebo sim.launch
If everything goes well, you should see the Gazebo simulation running and the GUI on your screen or VNC viewer.
🎨 Customizing the Workspace
To save your customization, you should fork the repository and clone the forked repository. You can then customize the workspace as needed and push the changes to your forked repository.
You can take a look of the following files and get an idea of what aliases/tools are pre-configured to make your life easier.
To further customize the workspace, you can:
- Add additional packages and productivity tools (e.g.,
autojump,htop, etc.) in the.devcontainer/Dockerfile. - Add additional features and vscode extensions in the
.devcontainer/devcontainer.json. - Add additional shell aliases and functions in the
.devcontainer/setup_alias.sh. - Add additional tmux configurations in the
.tmux.conf. - Customize you tmux session in the
scripts/start_smb_tmux.sh.
💡 Tips & Tricks
Tmux
Use tmux in the workspace and remote access the physical robot via SSH
Tmux is a terminal multiplexer; it allows you to create several “pseudo terminals” from a single terminal. It decouples the terminal from the main program (SSH at the remote), protecting it from being closed accidentally when connection is lost. It is particularly useful when remote accessing the physical robot via SSH, as it allows you to keep the program running even when the connection is lost and provides a multi-pane terminal interface for better organization.
Tmux mouse mode
We enable tmux mouse mode by default. You can use the mouse to switch between panes and scroll up and down in the terminal.
Tmux panes synchronization
You can toggle pane synchronization mode by pressing Ctrl+b and Ctrl+s. It is useful when you want to type the same command in multiple panes.
GUI
GUI Screen does not fit your screen in VNC?
You can try,
- Hover over the top of the window to see the menu bar, click on the first icon from the left (the full-screen icon) to enter full-screen mode.
- Hover over the top of the window to see the menu bar, click on the second icon from the left (the scaling icon) to scale the screen to fit the viewer.
- Or adjust the default VNC resolution. See VNC default resolution is too small? for more details.
Resize windows spawn inside VNC
We use fluxbox as the window manager in the VNC environment. It is more lightweight compared to the GNOME desktop environment.
To resize the windows, you can drag the window from the bottom left or right corner. If the window is too big to fit the screen, you can hold the Alt key and drag the window to move it around. If you just want to fit the window into the screen size, you can Right-click on the window title bar -> Maximize, this will fit the window into the screen size.
VNC default resolution is too small?
Modify build arguments VNC_RESOLUTION in the .devcontainer/devcontainer.json file and rebuild the workspace.
Shell
reverse-i-search
It is common to enter a command that you have used before. You can use Ctrl+r to search for the command in the history. We integrate fzf with the shell by default to provide a more interactive reverse-i-search experience.
Tab completion in zsh
We use zsh as the default shell. You can use Tab to auto-complete the command, file, directory name or even ros launch file parameters. When you press Tab twice, it will show you all the possible completions, and you can select the one you want by continuously pressing Tab until the cursor is on the desired completion.
