How to Connect to the SMB
In the following, the basic usage of the SMB payload is described.
Powering up the payload
The SMB payload can be powered by either the SMB payload power supply or a payload battery. You can also plug several power sources (e.g. power supply and battery). While the payload power supply is plugged, the battery will not be discharged but also not charged. Once the power supply is disconnected, the system automatically switches over to the first battery (as long as it it charged enough) and subsequently to the second battery.
Connecting the Battery
Please be sure that you are well informed about the type of the battery you are using. Read the safety document and do not hesitate to ask for help if you are not sure about something!
While placing the battery into its drawer, visually verify that the wires are not twisted, sheared or wedged into something!
If you notice or suspect even a small amount of expansion on the battery, inform your supervisor!
Do not cut the wires!
Be sure that wire tips are connected to the right way as the color of connected tips should be same!
Li-Ion batteries are affected by the same problems as other lithium based batteries. This means that overcharge, over-discharge, over-temperature, short circuit, crush and nail penetration may all result in a catastrophic failure, including the pouch rupturing, the electrolyte leaking, and fire.
Turning on the SMB payload
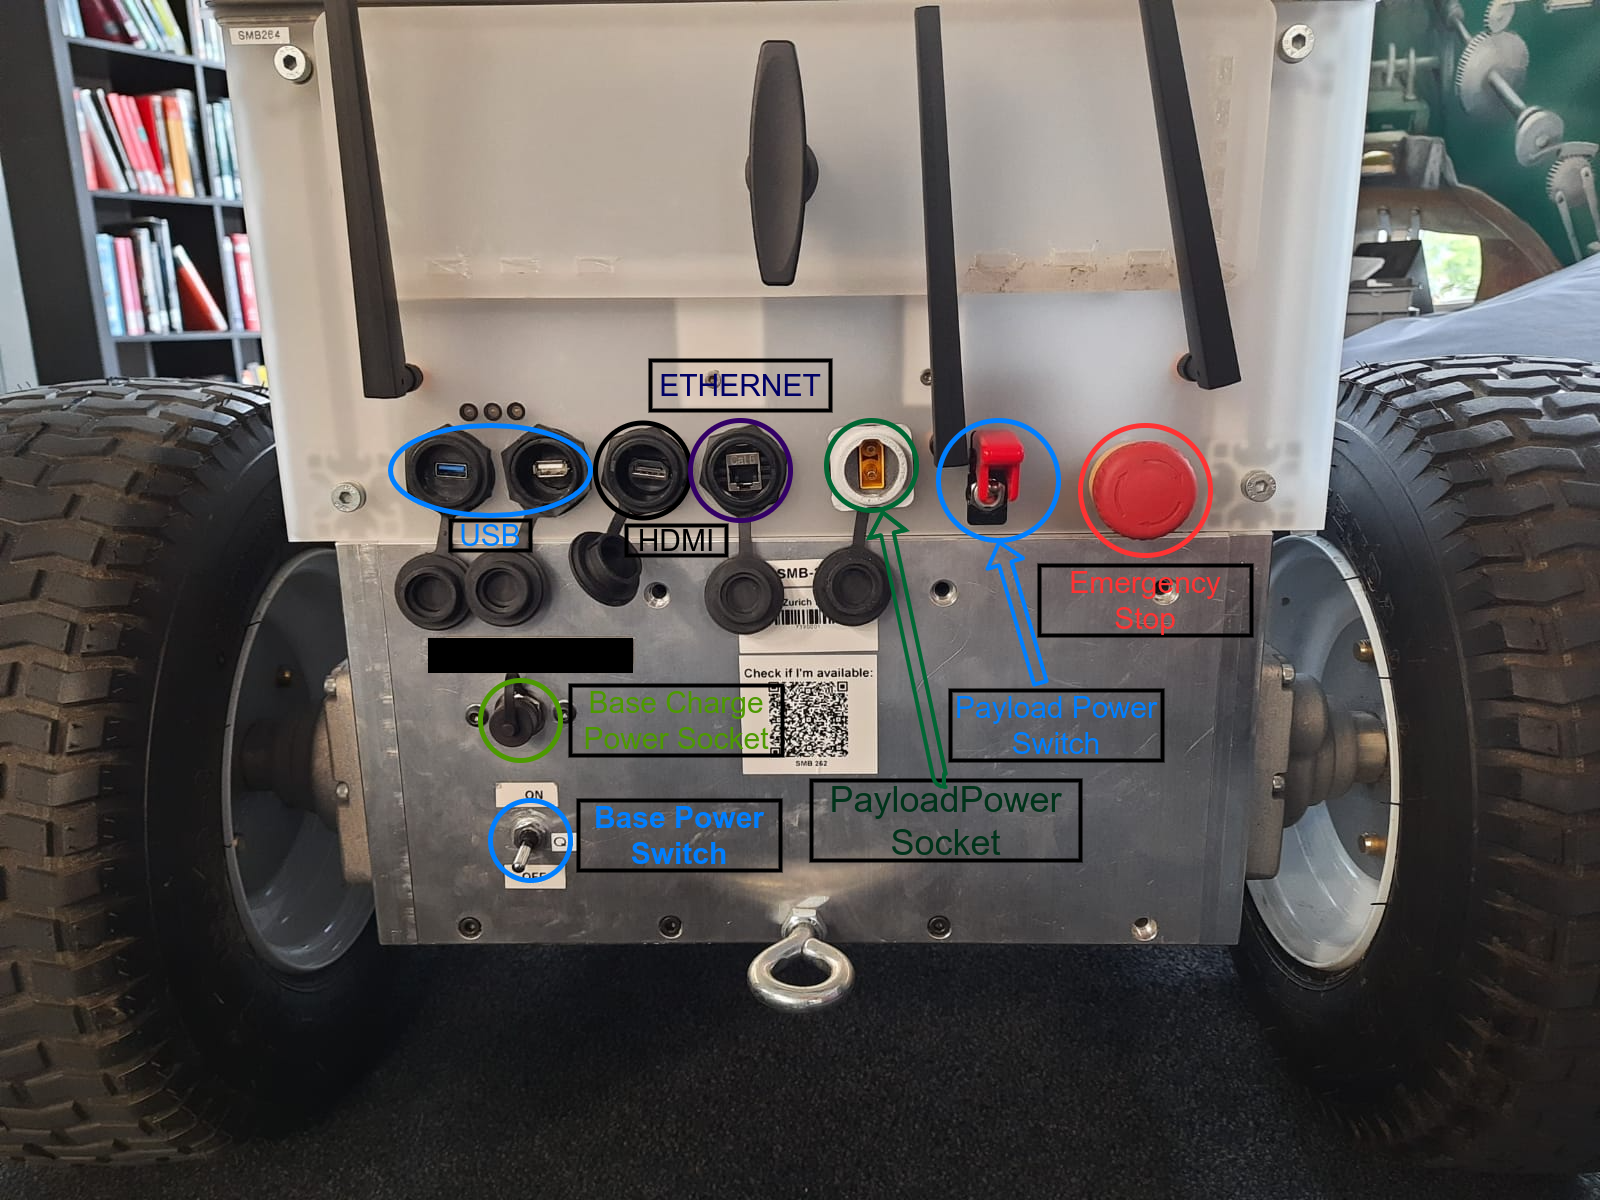
In order to power-up the computer on the SMB use the Payload Power Switch. Close the lid of the switch to prevent shut-down by mistake.
Connecting to the SMB
Remark
In the document there are two terminal types:
-
Terminal of host PC: The terminal that has access to host pc system.
-
Terminal of SSH: The terminal that has SSH connection to the SMB, therefore has access to the SMB system.
Connect to the SMB network
In order to connect to SMB, you can either use the Wifi of the SMB or connect using a ethernet cable.
Use the following details of the wireless network of the SMB:
- Wifi (SSID): SMB_26x
- Password: SMB_26x_RSS
where x is the last digit of SMB Robot Number
Once you are connected, from the terminal you should connect the SMB via SSH.
The ip addresses of every SMB is 10.0.x.5 where x is the last digit of SMB Robot Number. Example: For SMB 263 the on-board computer IP address is 10.0.3.5
Note that there might be an error in the host PC while trying to connect the SMB via ssh. Please read the terminal and use the suggested command in terminal to remove the previous ssh connection settings.
# In the terminal of host pc
# Do not forget to change x and <user>
ssh <user>@10.0.x.5
# Password: smb

#! Terminal becomes terminal of SSH!

# To connect the SMB to Internet
nmcli connection up
You should connect to the SMB with your given username. The Username is your team number. Example: For team 1, the username is team1
Once you are connected to the SMB you will see an IP address and port tuple on the terminal starting with ‘http://’. Please save it since we will need it in the next step.
If you do not see such a tupple, please start the roscore and check the part ROS_MASTER_URI.
# In the terminal of SSH
roscore
# See the part of ROS_MASTER_URI
Visualization Settings
In order to use the visualization tools of ROS, we will set the SMB as ROS master on our local machine:
# In the terminal of host pc.
export ROS_MASTER_URI=http://10.0.x.5:<port>
# the ip and port tuple we have saved in the previous step
Now we can run SMB software and visualize it in the host pc.
In order to give commands from the host pc to SMB, ROS_IP should be set.
# In the terminal of host pc

ifconfig
# See the ip addres of wlp4s0
# It is probably 10.0.x.100

export ROS_IP=<wlp4s0_ip>
# the ip and port tuple we have saved in the previous step
Note that at every new terminal you have to repeat the steps under the title of Running the Software. Please refer to the Notions and Devices document for more information related to ‘export’ command.
To use the packages and run the software please refer to the How to Run Software