🤖 Controlling the Physical Robot
This section contains the documentation related to working with the physical Unitree A2 robot. This includes bringing the robot online, checking safety-critical hardware, and carrying out supervised walking tasks.
💡 Remarks
In this document, we will refer to two types of terminals that you will be using in the following way:
- Terminal on your PC: A terminal on your PC (called host PC).
- Terminal of the A2: A terminal on the A2, established via an SSH connection.
🐃 🚶 Power Up and Walk the Robot
A safety distance of 3 meters needs to be kept while the Unitree A2 is driving.
There must always be one safety operator (=TA) walking with the robot with the Unitree remote control as “E-Stop”.
If anything suspicious happens with the robot hardware, such as heat, smoke, or sparks, report it to the staff immediately.
If batteries are damaged or inflated, distance yourself immediately and inform the staff.
This section describes the standard bring-up flow for the physical Unitree A2 used during the summer school. The goal is to power the robot safely, verify the basic hardware state, and prepare it for supervised walking tasks.
⚡🔋 Powering Up and Batteries
Before touching the Unitree A2, make sure the surrounding area is clear and that the robot has enough space to stand up and move without contacting people, furniture, obstacles, or cables.
Inspect the robot visually before every session. If anything looks unusual, stop and ask a staff member to inspect the robot before continuing.
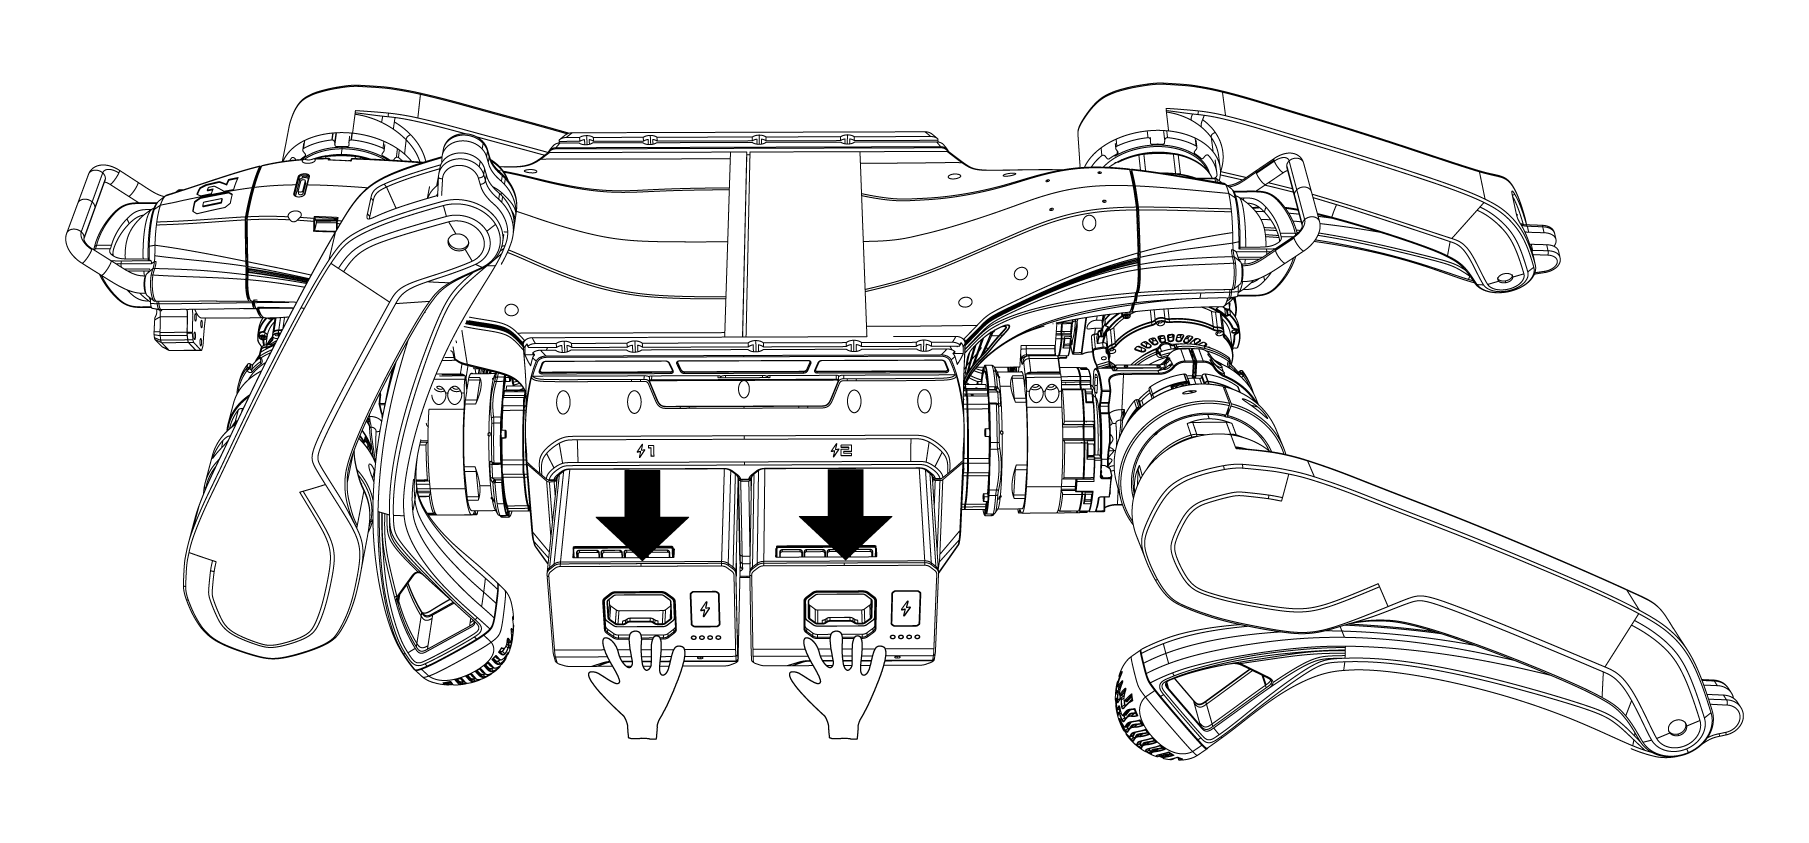
Install Batteries
As shown in the figures, insert the two batteries into the A2. Pay attention to the insertion direction and do not use excessive force to avoid damaging the battery interfaces and buckles. The installation is complete when you hear a “click” sound.

Robot Placement
Before powering on, ensure the robot is placed on flat ground. The support pads on the robot’s abdomen should be flat against the ground. The body should be horizontal without tilting, and the robot’s calves should be fully retracted. The four knee joints and feet should rest flat on the ground, ensuring that neither the thighs nor the calves are pressed under the body.
[!CAUTION] The straight antennas protruding from the payload are easily damaged. Avoid contact during movement and leg placement.
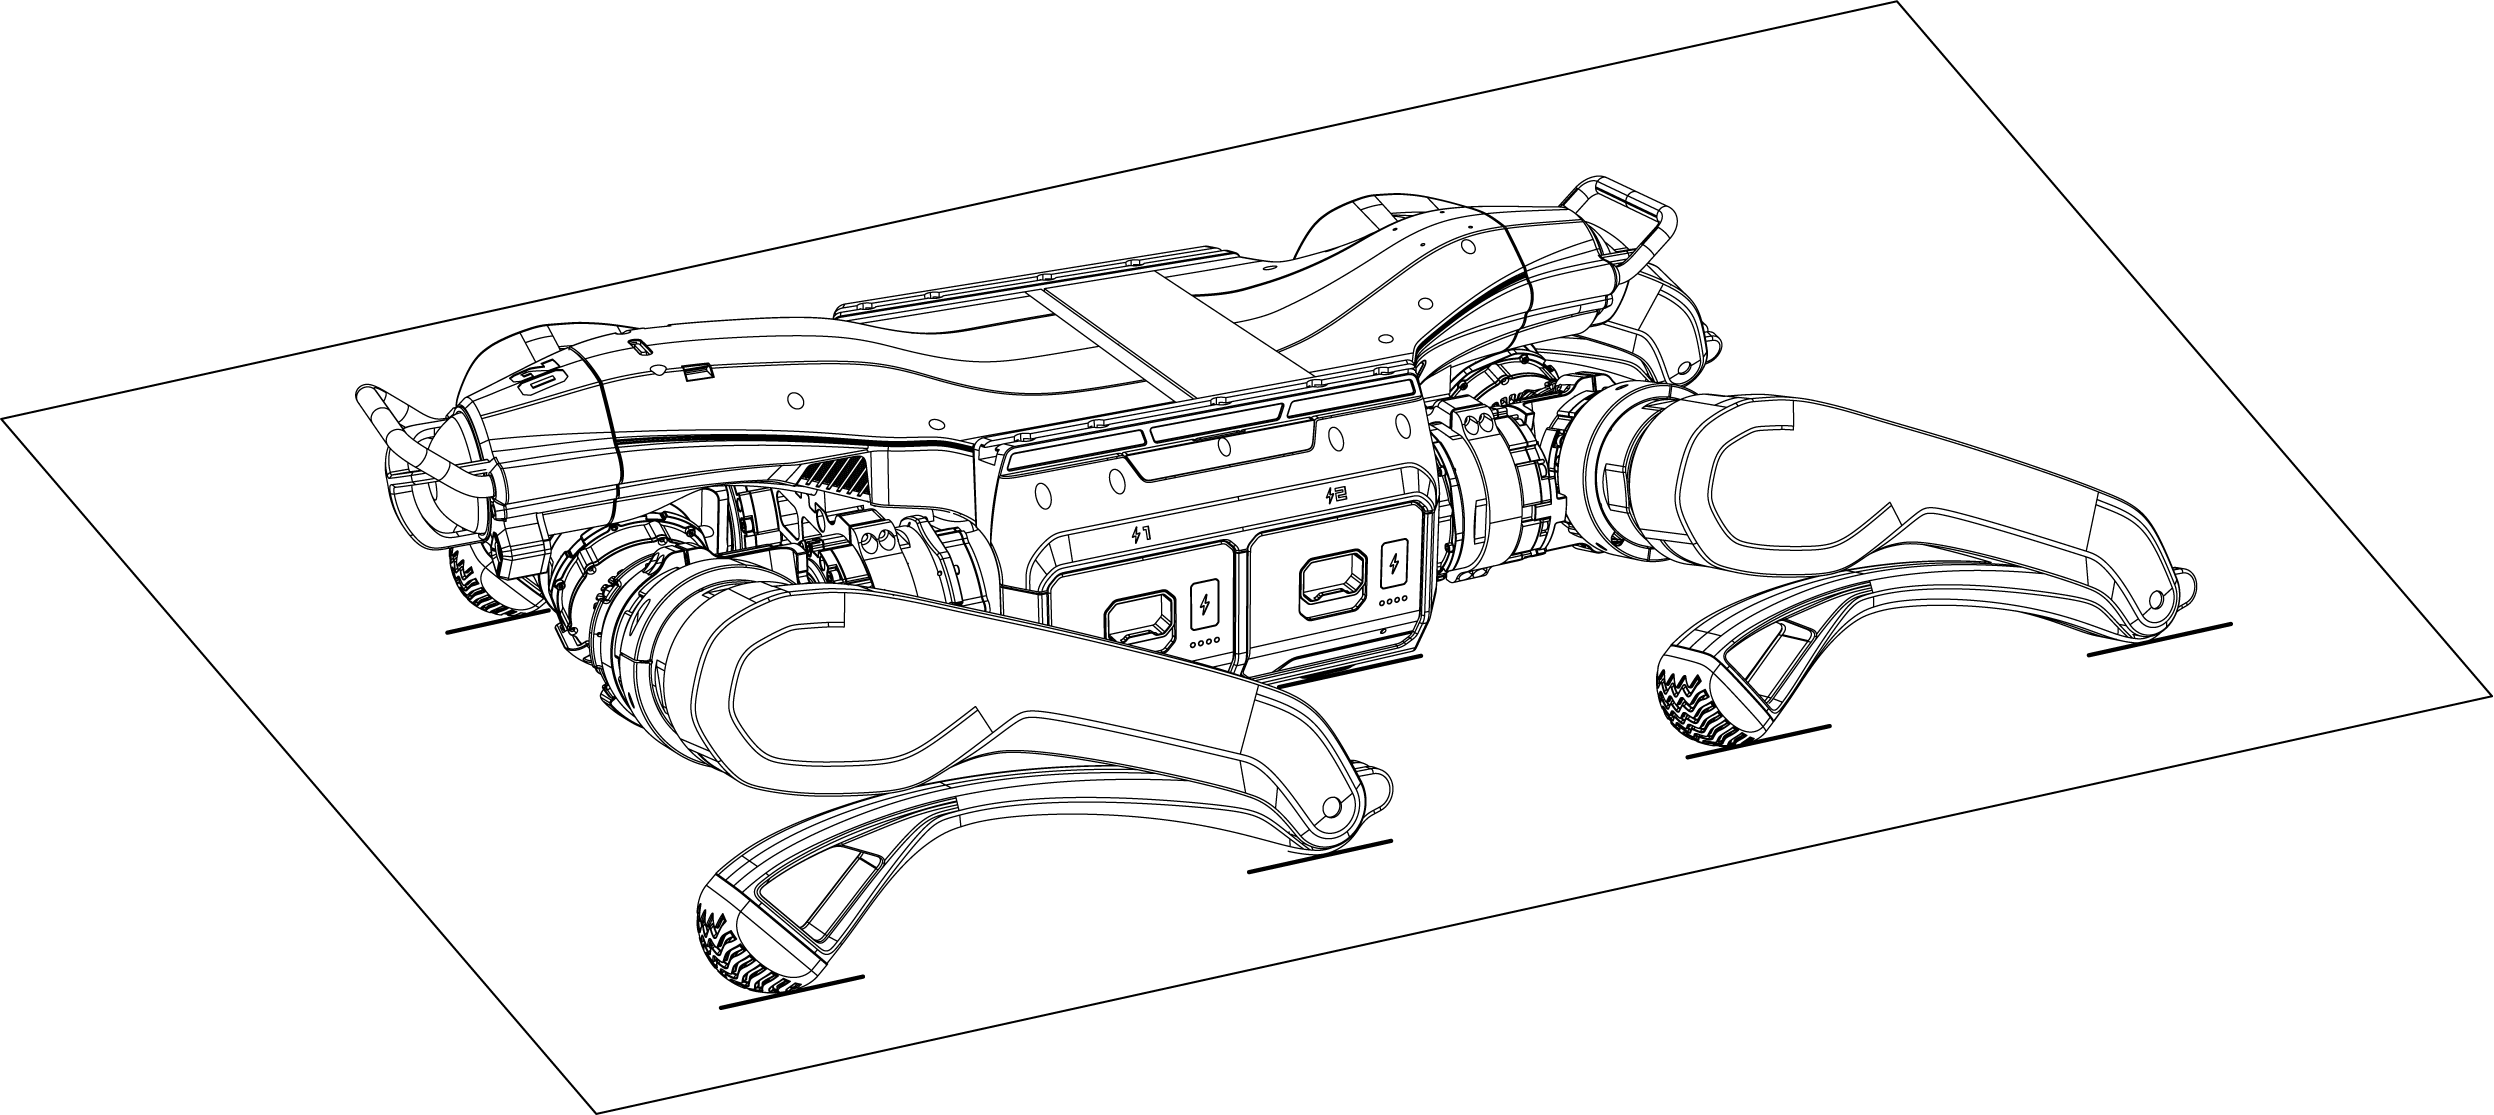
Note on Arbitrary Startup
The A2 motors use dual encoders, so the requirements for leg placement before startup are not strict. However, it is recommended to use a posture close to the one shown in the figure to avoid the legs hitting the body when adjusting posture after power-on.
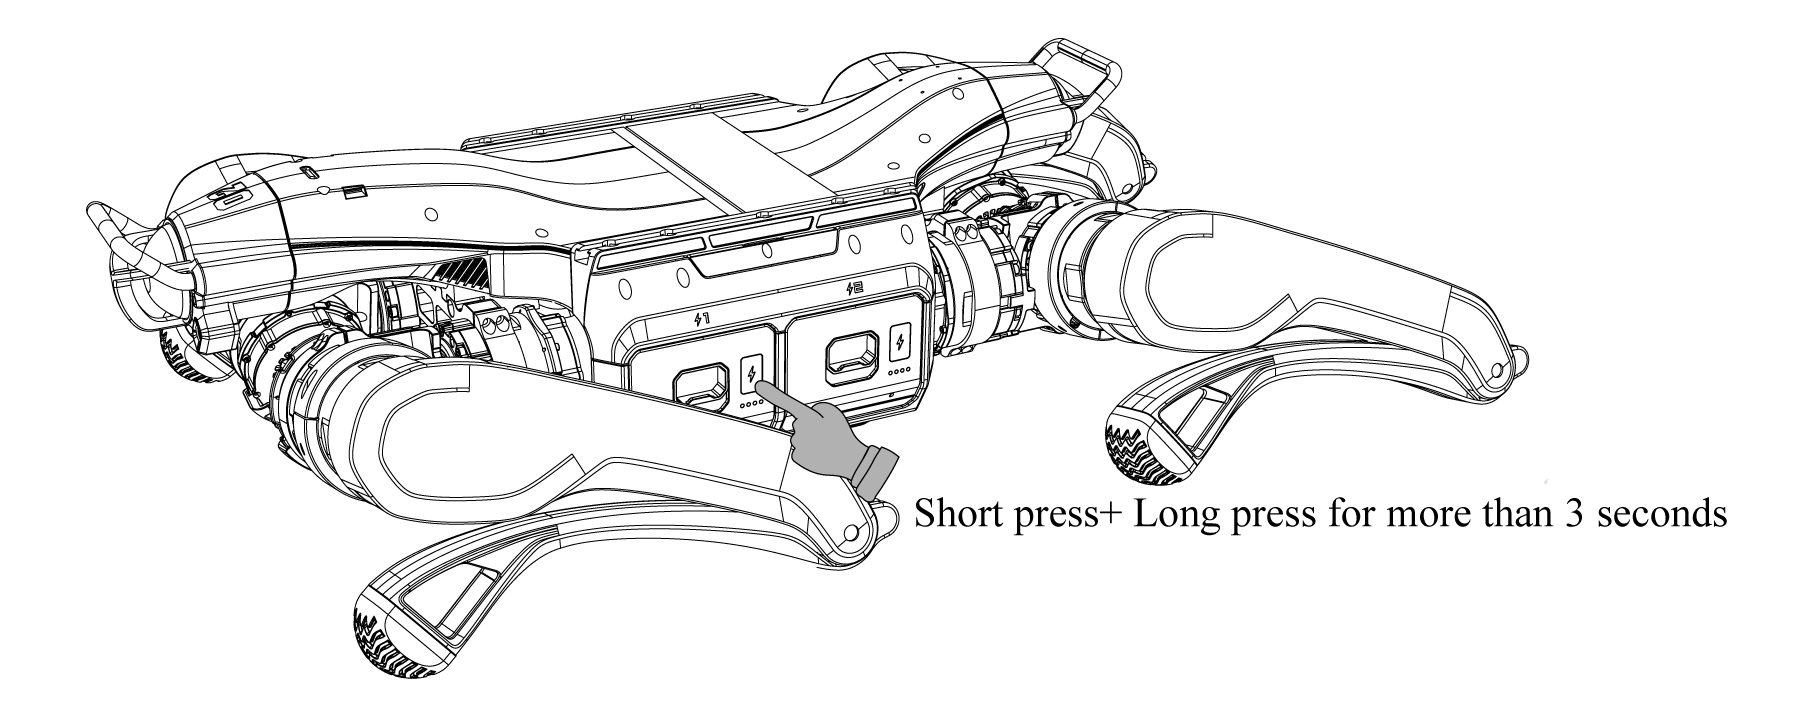
Power On
After completing the pre-startup checks and placing the robot as required, follow these steps to power on: Press 1x power button once briefly, then press and hold the power button for more than 3 seconds to turn on the battery. When the battery is on, the indicator light remains solid green and displays the current charge level.
After startup, wait about 2 minutes. The Unitree A2 should automatically stand up and immediately should lay down again! This indicates that the startup sequence completed successfully.
[!CAUTION] Wmportant Notice: When testing in the afternoon, the two small payload fans must be running to prevent overheating from the intense sun. 🥵 Ask a TA for this.
Once the robot is powered, verify that the onboard computer is reachable and that the expected status indicators look normal. If the robot does not boot cleanly, if the battery status appears abnormal, or if you notice unexpected sounds, heat, or warnings, stop immediately and hand the issue over to the staff.
🔌 Battery Removal and Charging
① Press and hold the battery buckle to remove the battery from the A2 body.
② Plug the charger into the AC power supply first and then connect the A2 battery.

Note on hot swapping
The Unitree A2 uses a parallel dual-battery system that allows hot swapping. In practice, this means one depleted battery can be replaced while the robot remains powered by the other battery.
To do this, first turn off the battery you want to replace by pressing the power button once briefly and then pressing and holding it for more than 3 seconds. Wait a few seconds until the robot is clearly running on the remaining battery only. Then remove the depleted battery and insert the replacement battery carefully.
🎮 Remote Control
After the Unitree A2 has started successfully and is resting in a controlled state on the ground, you can proceed with the PS5 remote control.
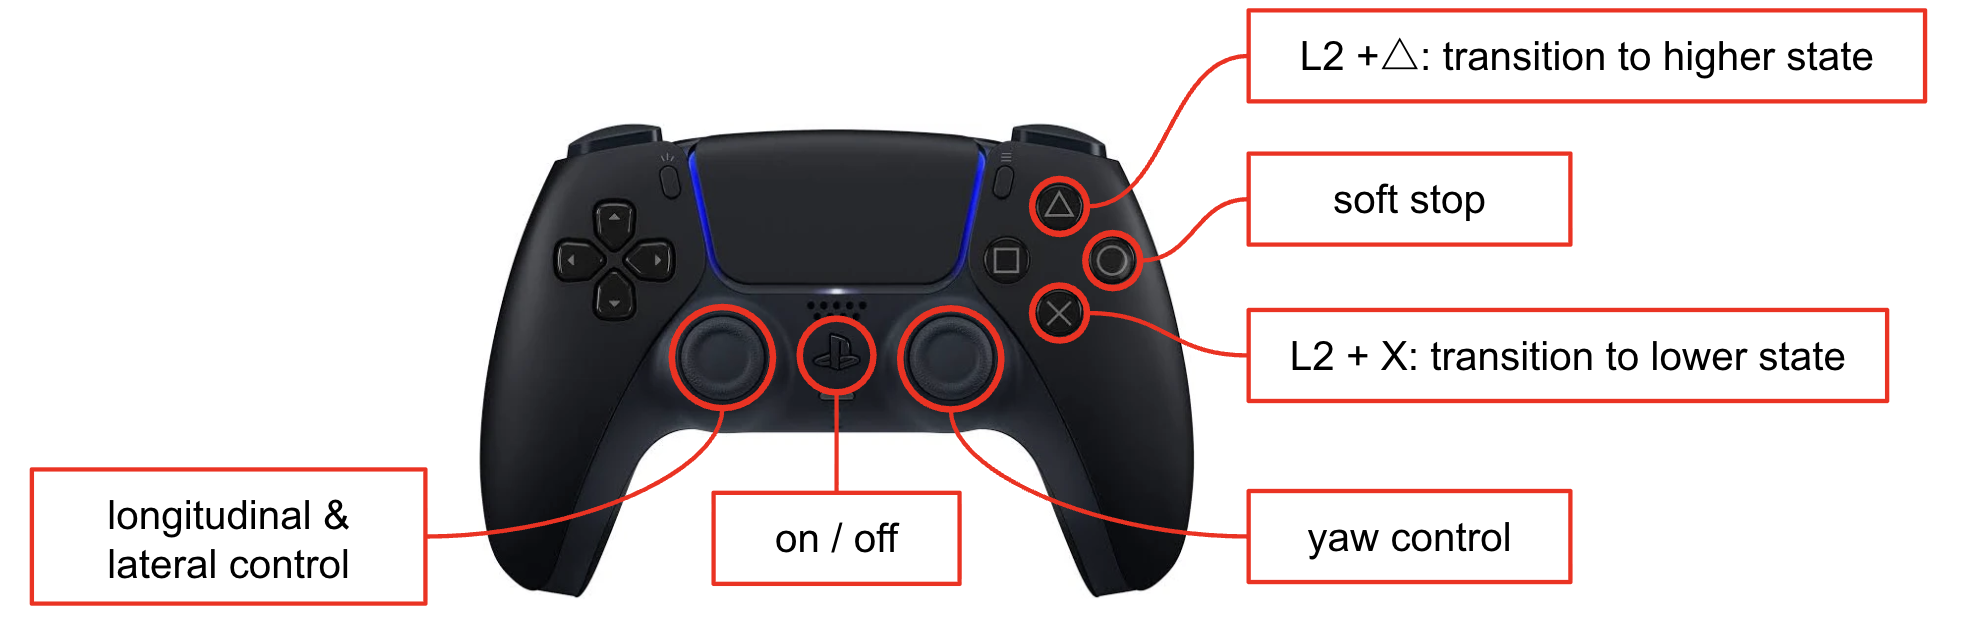
The main teleoperation inputs are:
| Input | Action |
|---|---|
| Left stick | Forward / backward / strafe |
| Right stick horizontal | Yaw |
L2 + △ |
Stand (3x to walk) |
L2 + X |
Sit (3x) |
O |
STOP |
Use these commands deliberately and only after the robot is visibly stable. In particular, wait until the robot has completed its startup sequence before switching to standing or walking mode.
A distinct vibration from the controller confirms that the transition to walking, sitting, or stop-mode has been fully executed.
Only start walking procedures after confirming that the Unitree A2 is in the intended operating mode, that all team members understand who is responsible for motion commands, and that the TA with the Unitree remote control is ready to act as the safety backup.
Shutdown Procedures
At the end of a run, bring the Unitree A2 back to a stable and controlled resting state before powering anything off. Make sure the robot is no longer executing a walking command, confirm that it is stationary, and only then proceed with the shutdown.
① Use the command L2+X three times to make the robot lie down safely.
② Then, simultaneously press the 2x power buttons on both batteries using the short-press plus long-press sequence for more than 2 seconds. Once the indicator lights go out, the power-off process is complete.
🔗 Connecting to the A2
The necessary steps to connect to the on-board computer should be completed before operating the robot. Use the host PC to establish the required SSH session to the A2 and verify that the robot is reachable before continuing with any hardware procedure.
Connect to the Robot Wi-Fi
Before using SSH, first connect your host PC to the robot’s Wi-Fi network.
Use summerschool as Wi-Fi password. Once your PC is connected to the robot network, you can continue with SSH access to the onboard NUC.
If you are not connected to the robot Wi-Fi, the SSH and RDP connections below will not work.
SSH Access to the NUC
Each team receives its own user account on the robot’s onboard NUC (computer). Open a terminal on your host PC and connect with SSH:
ssh team#@192.168.124.124
Replace # with your team number. For example, team 3 should connect as:
ssh team3@192.168.124.124
The robot-side username is always the same as the team name, for example
team1,team2, orteam8.
After logging in, you are working in a terminal directly on the NUC. This is the terminal from which you start the robot-side Docker services.
Setting up SSH Configurations
Rather than typing the full address and username each time, add an entry to your local ~/.ssh/config. This also enables agent forwarding, which lets you push and pull from GitHub on the NUC using your own SSH key — without copying your private key onto the robot.
1. Make sure your key is loaded in ssh-agent
# On your own machine
eval "$(ssh-agent -s)"
ssh-add ~/.ssh/id_ed25519   # or id_rsa — whichever key GitHub knows about
2. Add an entry to ~/.ssh/config
Replace N with your team number (1–8):
# RSS 2026 — Robot NUC (Team N)
Host rss-nuc
    HostName 192.168.124.124
    User teamN
    ForwardAgent yes
    ServerAliveInterval 30
    ServerAliveCountMax 3
Save the file, then connect with simply:
ssh rss-nuc
3. Agent forwarding — how it works
With ForwardAgent yes, your local ssh-agent (which holds your private key) is forwarded to the NUC over the SSH connection. This means:
- Git operations on the NUC (
git pull,git push,git clonefrom GitHub) authenticate as you without your private key ever leaving your laptop. - You do not need to generate a new key pair on the NUC or add an extra key to your GitHub account.
Organizing and Updating Your Codebase
Each team has the base a2_ros repository in ~/workspaces/a2_ros
cd ~/workspaces/a2_ros
To switch to a custom fork, change the origin:
git remote add upstream git@github.com:ETHZ-RobotX/a2_ros.git
git remote set-url origin <your custom fork link>
The upstream allows changes from the base branch to be accessed in case needed.
Remember to update the submodules
git submodule update --init --recursive
With the SSH Agent Forwarding setup, updates to the codebase can be pulled from github onto the robot. Remember to update submodules to ensure everything is in sync.
Starting the Robot Software Container
On the NUC, start the ROS container for the physical robot:
cd workspaces/a2_ros
docker compose up -d a2_ros_nuc
Then enter the running container:
docker compose exec a2_ros_nuc bash
Once inside the container, you can launch the same high-level workflows that are used in simulation. The main difference is that you now operate the hardware stack instead of MuJoCo.
If
docker compose execfails, first check that the service actually started and that the robot has completed its boot sequence.
Bringing Up Sensors and Core Services
After entering the a2_ros_nuc container, launch the main robot-side stack:
ros2 launch a2_ros nuc.launch.py
This brings up the hardware interfaces and the main onboard sensors required for operation on the physical A2.
Keep this terminal running while using the robot. Open additional terminals as needed for the tools below.
Running the Main A2 Workflows
Similarly to the simulation workflow, the provided a2 commands can be used on the real robot once the NUC container is running.
Open a new terminal on your host PC, SSH into the robot again, and enter the container:
ssh rss-nuc # or team#@192.168.124.124 if SSH config not setup
cd workspaces/a2_ros
docker compose exec a2_ros_nuc bash
You can then launch the main workflows:
a2 dlio
Starts DLIO LiDAR-inertial odometry.
a2 nav
Starts the navigation stack.
a2 explore
Starts the exploration stack.
Depending on the exercise, additional a2 commands may be used in the same way as in the simulation section. The general pattern is always:
- Connect to the NUC with SSH.
- Enter the running
a2_ros_nuccontainer. - Start the required
a2command in its own terminal.
GUI Access with Remmina
Some tools are easier to use through a remote desktop session to the NUC. On your host PC, install Remmina if it is not available yet:
sudo apt update
sudo apt install -y remmina remmina-plugin-rdp
Then open Remmina and create a new connection:
- Press the
+button in the top-left corner. - Set Protocol to RDP.
- Set Server to
192.168.124.124. - Set Username to
team#, replacing#with your team number. - Set Password to the same value as the username.
For example:
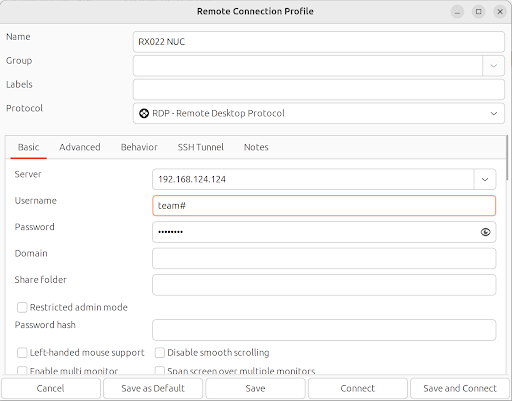
After connecting, you should see the desktop session running on the NUC.
Display and GUI Checks
If you plan to start GUI applications such as RViz, first check which display is used inside the remote desktop session:
echo $DISPLAY
This command prints the display number, for example :0 or :1.
In the terminal in which you want to run RViz, export exactly this value:
export DISPLAY=:0
Replace :0 with the value shown by echo $DISPLAY in the remote desktop session.
💾 Recording Bags and Transferring Them
Bag recording on the physical robot is typically done inside the Docker container. A common setup is to record directly to the MCAP format.
Inside the container, run e.g.:
ros2 bag record -s mcap -o ./<bag_folder>/<bag_name> /front_lidar/points /front_lidar/imu /front_lidar/ptp /joint_states /tf /tf_static /lowstate /imu/data /camera/image/compressed /camera/camera_info
Replace <bag_folder> and <bag_name> with your own folder and recording name. Ensure the folder is inside the /a2_ros workspace and not on your home directory of the container
Stop the recording with Ctrl+C once your run is complete.
Copy Bags from the NUC to Your Local PC
Once the bag is available on the NUC filesystem, copy it to your local PC (outside the docker) with scp:
scp -r rss-nuc:/home/team#/workspaces/a2_ros/bags ~/bags/
This copies the bags to a folder such as /home/<your_user>/bags on your local machine.
Replace the username and target directory as needed for your team setup.